Russian Honey Cake
Nov 19, 2020
SERVING SIZE: 8 - 12 SLICES
Recipe by Deb Perelman of Smitten Kitchen
Time: about two hours on the first day + an overnight rest
Special materials: parchment paper, baking sheets, 9-inch round item to trace around

Cake layer ingredients
-
1/2 cup (170 grams) Frangiosa Farms raw Rocky Mountain honey (you can order directly from our farm's website here.)
-
1/2 cup (100 grams) sugar
-
1/2 cup (115 grams) unsalted butter
-
1 teaspoon baking soda
-
3 large eggs
-
1/4 teaspoon fine sea or table salt
-
1 teaspoon (5 ml) vanilla extract
-
3 1/2 cups (455 grams) all-purpose flour, divided
Frosting and filling ingredients
-
32 ounces (just shy of 4 cups or 900 grams) sour cream
-
1 14-ounce can (400 grams) sweetened condensed milk
Heat oven to 350 degrees F. Prepare 6 sheets of parchment paper wide enough to accommodate a 9-inch circle. Have 2 or more baking sheets at the ready.
Make cake dough
- In a medium-sized saucepan, combine the sugar, honey and butter over medium heat.
- Once simmering, cook for 3 to 4 minutes. It should get a faint shade darker.
Whisk in baking soda
- Remove from heat and set aside for 2 to 3 minutes. It’s not going to significantly cool off, just settle a little.
- Lightly beat your eggs in a spouted measuring cup (for easiest pouring) or small bowl.
- Whisking the honey mixture vigorously in the pot the whole time, drizzle the thinnest stream to temper the eggs into the honey mixture. Do not stop mixing. You do not want scrambled eggs in your honey mixture. Continue until all of the eggs are thoroughly whisked in.
- Stir in the salt and vanilla and 3 cups (390 grams) of the flour with a spoon. The dough is going to be thick. Stir in the last 1/2 cup of flour 1/4 cup at a time. This could be done by hand or in the bowl of an electric mixer with the paddle attachment.

Shape and bake the cookies/cakes
- Lightly flour your counter and divide the still-warm dough into 8 even pieces (this is easiest accomplished with a pastry cutter, or you can eyeball it). Roll the first one between two sheets of parchment paper (no flouring needed) to a slightly-bigger-than-9-inch round.
- Remove top sheet of parchment paper. Very lightly dust the top with flour if you’re going to put something on it (such as the bottom of a 9-inch cake pan or the rim of a 9-inch bowl) to trim the shape to an even 9-inch circle.
- Save the trimmings — put them aside on one of the sheets of parchment paper, it’s fine if they overlap a little. Dock the circle all over with a fork.
- Slide your 9-inch round onto a baking sheet and bake for 6 to 7 minutes; it should feel firmish and get slightly darker at the edges.
- Slide the cake onto a cooling rack. Go ahead and reuse the parchment for another layer.
- While the first layer is baking, roll out your second piece so it’s ready to go into the oven as soon as the first comes out. If you’re making good time, get the third ready too and continue to bake them two at a time.
- Keep adding the unbaked cake trimmings onto one piece of parchment paper. Repeat this process as you bake each round and you’ll have all 8 baked before you know it.
- Finally, take that last sheet of parchment with all of the cake dough scraps on it and slide it onto a baking sheet and bake it, checking in at 4 minutes, because the thinnest scraps will want to burn quickly. By 5 minutes, all should be baked until pale golden.
- Let cool completely and save until you’re ready to decorate the cake tomorrow.

Fill and frost the cake
- Whisk sour cream and sweetened condensed milk together in a large bowl. Once cake layers are cool, place a dab of the sour cream mixture on your cake plate and place the first cookie on top of it to help adhere it.
- Cut or tear one of your used pieces of parchment paper into strips and tuck them all around the underside of the cake to protect your cake plate. This isn't a necessary step, but is helpful if you want to keep your cake platter clean.
- Scoop 3/4 cup sour cream mixture onto the center of your first cake layer. Spread it only a little from the center, leaving a good 1- to 2-inch margin of unfrosted cookie. Stack the second cake on top and repeat until you have 8 layers.
- This gets messy fast. The sour cream will spill out and down the sides and the cake layers will slide around and not stay neatly stacked. Don't worry about it, this is an exercise in wabi sabi baking.
- Put the cake in the fridge for a couple hours (1 to 3) and when you come back to it, nudge the stack gently back into place and use a spoon and icing spatula to scoop the spilled-out filling back up the sides and onto the top of the cake. Don’t worry about it looking neat. Let it chill overnight.

After it's chilled overnight
- The next day, finish the cake: Grind your baked, reserved cookie scraps in a blender or food processor or put them into a ziplock bag and beat them with a rolling pin.
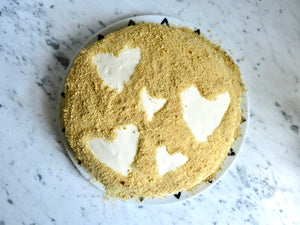
- Take your cake out and do one final frosting clean-up. Spread any newly puddled sour cream back up the sides and across the top. Use a small spoon to sprinkle the top and sides of the cake with the crumbs.
- The cake can be served right away or kept in the fridge for up to 5 days. When slicing, a knife dipped in hot water makes clean cuts.
